写作
Markdown
基本语法可以参考开源文档 Cmd Markdown 简明语法手册。
图片缩放
其中,尾部的参数可以使得图片居中,且能够指定缩放大小。
也可以指定像素值:
图片显示圆形轮廓
单个图片居中
全局图片居中
插入标题
<figure markdown>
<figcaption>标题</figcaption>
</figure>
插入表格
下面是一个简单的示例:
| 水果 | 价格 | 数量 |
| :-- | ---: | :---: |
| 苹果 | ¥5.00 | 10 |
| 香蕉 | ¥3.00 | 5 |
| 葡萄 | ¥8.00 | 20 |
在这个表格中,第一列使用了居左对齐方式,第二列使用了居右对齐方式,第三列使用了居中对齐方式。
如果您想要调整表格的宽度,可以根据需求修改列对应的 : 以确定对齐方式和宽度。例如,如果您想要将第一列和第三列各占据表格宽度的 30%,第二列占据表格宽度的 40%,则可以像下面这样修改:
| 水果 | 价格 | 数量 |
| :--------- | :-------: | ---------: |
| 苹果 | ¥5.00 | 10 |
| 香蕉 | ¥3.00 | 5 |
| 葡萄 | ¥8.00 | 20 |
在这个表格中,第一列和第三列的 : 从 :-- 和 :---: 改为了 :--------- 和 ---------:,表示每列占据表格宽度的 30%;第二列的 : 从 ---: 改为了 :-------:,表示占据表格宽度的 40%。这样就可以根据需要调整表格的宽度和对齐方式了。
格式化
使用 autocorrect 自动格式化文档。
下载 autocorrect 的可执行文件,以在命令行中使用:
https://github.com/huacnlee/autocorrect/releases
将autocorrect.exe可执行文件放在当前目录下,可通过下面的命令行检查和修复格式问题。
检查格式问题
修复格式问题
Warning
.\autocorrect --fix .\ 会将当前目录下的所有文件全部递归格式化,修复后无法撤销!请做好备份,谨慎使用该命令!
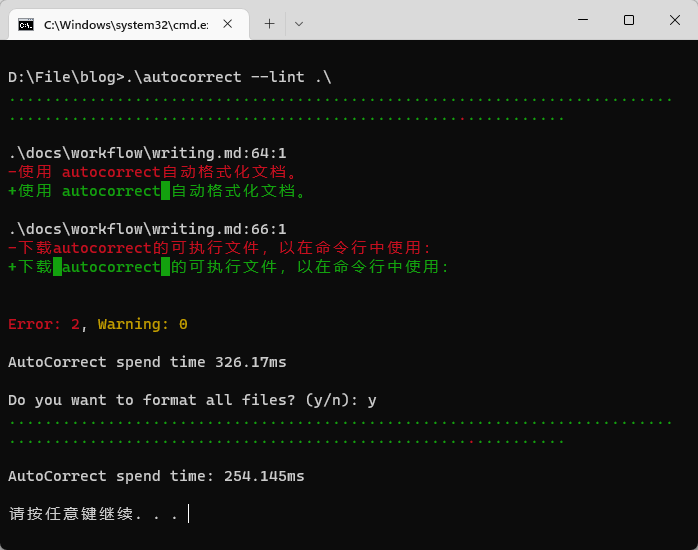
自动检查格式问题并选择是否修复的批处理脚本
:: This is a simple script to run autocorrect on all files in the current directory
.\autocorrect --lint .\
@echo off
set /p user_input=Do you want to format all files? (y/n):
if /i %user_input%==y (goto Yes) else (goto No)
if /i %user_input%==n (goto No) else (goto Invalid)

:Yes
.\autocorrect --fix .\
pause
exit

:No
pause
exit

:invalid
echo %user_input% is invalid, try again!
pause
exit
这段 Batch 脚本学习了 AutomatewithRakesh@youtube 的教程。
使用效果
\(\LaTeX\)
模板
这里 有自用的 \(\LaTeX\) 模板,包括作业、书信等场景。
速查笔记
这里 有速查笔记。
Mac OS 配置 \(\LaTeX\)
参考:Mac OS 配置 \(\LaTeX\) (MacTex+VSCode+Skim)
- \(\TeX\) 代码跳转到 PDF:Cmd+Option+J
- PDF 跳转到 \(\TeX\) 代码:按住 Cmd+Shift 并用鼠标点击文档。
数学公式
基本语法可以参考开源文档 Cmd Markdown 公式指导手册。
设置全局行距
设置 section 标题格式为左对齐,加粗,大号字体
参考:https://tex.stackexchange.com/a/247571/
修改中文字体
以下命令将正文设为宋体,粗体设为黑体。
自定义摘要样式
\usepackage{abstract}

\renewcommand{\abstractname}{\zihao{3} 摘要\\} % 设置摘要名称和摘要字体大小
\setlength{\absleftindent}{0pt}
\setlength{\absrightindent}{0pt}

\begin{abstract}
     This is abstract
\end{abstract}
更改摘要本身的字号大小
如果你要更改“摘要”这几个字的字体大小,可以使用\renewcommand命令来重定义摘要标题的格式。下面是一个例子:
\documentclass{article}

\renewcommand{\abstractname}{\large\textbf{摘要}} % 将"摘要"改为加粗、大号字体

\begin{document}

\begin{abstract}
这里是摘要的内容。
\end{abstract}

\end{document}
在\renewcommand命令中,我们定义了一个新的命令\abstractname,并将其设置为了加粗、大号字体的“摘要”。你可以根据需要更改这个命令的定义,以达到自己想要的摘要标题格式。
Jupyter Notebook 通过 \(\TeX\) 转换为 PDF
工作流程:
-
先通过网页版
Jupyter Notebook转换为 \(\TeX\) 文件,得到一个压缩包。 -
在
\documentclass[11pt]{article}下面补充\usepackage[UTF8]{ctex},以支持中文:
-
使用 \(\LaTeX\) 编译成 PDF 文件。